


How to Backup and Restore Your Website from a Backup
Often, hosting providers themselves create a safety backup copy, and if something happens, you can contact technical support to help restore lost data from the site backup. But there is no guarantee that the host will help. It’s better to be safe.
There are many situations where there is a risk of losing all project data. It is essential to back up your site. If data is lost, you can try to recover it using the Web Archive, which often creates copies of websites. However, this solution only helps for promotional sites or landing pages where everything is on the surface. The Web Archive cannot see or copy scripts from the project’s backend.
In this article, we will cover only the most basic type of manual site backup. If you have a serious project on which the company’s operations depend, we recommend setting up automatic backups to Amazon's elastic storage, separately for code and database, and also keeping the code up-to-date in the repository from which you update the project.
Creating a Website Backup Using FileZilla File Manager
Websites based on a CMS consist of two parts:
- CMS engine files;
- database (some CMS settings are stored there).
We need to create a backup of all this. How often should this be done? It depends on how frequently information is updated on your project. Ideally, back up your site every day. The files are small, so it won't take much time. Make a new backup version of the site and database only after any updates or changes.
Start with FileZilla. Of course, you can use any other file manager, but this one is arguably the most convenient. To create a site backup, log into your hosting platform, find the root folder (likely public_html). On the right side, you’ll see the server we are connected to, and on the left, the local computer’s file system.
If you plan to create backups frequently, it's best to create a dedicated folder on your computer, with subdirectories named by the date the backup was made. This makes it easier to find the needed backups and delete outdated ones.
Now in FileZilla, on the left open the folder where you want to save the backup, and on the right open the site's root folder. We recommend enabling the display of hidden files in FileZilla. To do this, in the top menu, find "Server" and click "Force showing hidden files". This is necessary to copy them. Then simply select all files and folders by holding Shift, and click "Download".
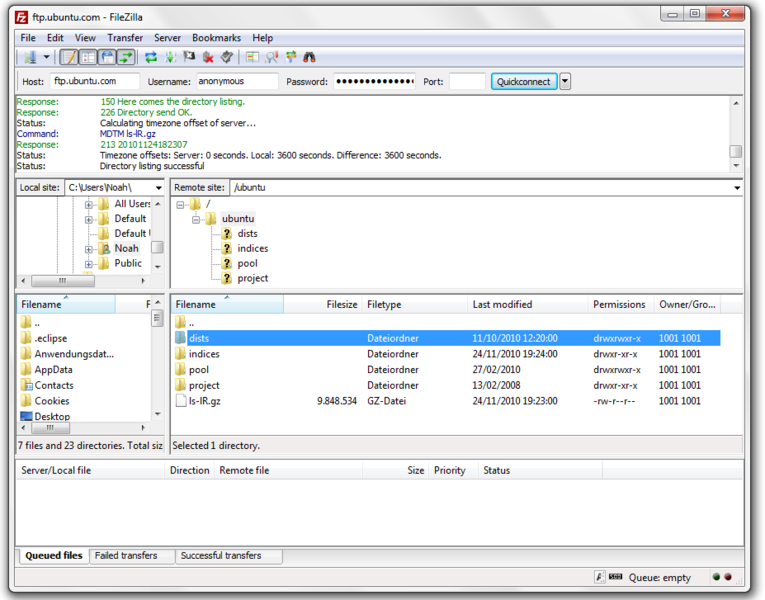
The backup will then begin. It may take a while, depending on the volume of data, internet speed, and server performance.
Once all files are downloaded, it's best to archive them for compactness. After archiving, you can keep only the archive and delete the rest. To restore, unzip the archive and upload the files to the server.
If you archived in zip format, you could directly move the files to the root folder and unzip, but it's better not to do that. Errors or file corruption may occur.
How to Copy the Database Using phpMyAdmin
First, log into your hosting control panel. If you have cPanel, find the "Databases" section and click on the phpMyAdmin icon. If your hosting does not provide access to phpMyAdmin, you can install it yourself on the platform and thus gain access to the databases.
To install phpMyAdmin, first download it. Then extract it and upload all files to the site root using a file manager. Then open the link http://your-site.com/phpmyadmin in your browser. The management window will open. There you can create a backup of your database. There may be several databases on the same host, so before copying, select the one you need. To get a copy, click "Export" above the table. In the next window, choose gzip.
To restore the database later, first delete the corrupted database, then click "Import" above the table and select the previously saved backup.
Site Migration Nuances
To move to a new hosting provider, you need to upload the backup copy to the new server and then restore the database. To do this, create a new database on the new platform. Note that the access credentials on the new hosting will differ from the old one. Therefore, you need to adjust the CMS.
WordPress
In the site root, find the wp-config.php file and edit the lines containing the access credentials.
Joomla
Find the configuration.php file in the root and edit the parameters responsible for database access. Also, you need to update the path to the file where logs are stored.
SMF
Open the settings.php file and edit it. Change the login and database name.